Beginner Dos and Don'ts For Stompbox DIY
The advice and ideas in this article come from my experience with designing and building my own pedals over the last dozen years. Because I have made a business of supplying components to other people, I have also had the opportunity to learn from engineers and designers who know Much more than I do. I have been where you are, and I hope I can help you to have a happy first experience and avoid pulling your fur out in frustration.
If you happen to be reading this before you actually pick up tools, good! If you have already hit one of the land mines that I mention next, it's OK. At worst, you'll back up a bit and take a different path on the learning curve, or a smaller bite of the apple.
First, a bunch of Don'ts and 'land mines':
-
Don't do as a first build a soldered version of something from a schematic. There are many reasons why I discourage this:
--The schem you pick may not be right for what you want to do.
--The schematic may not include details that are required for your purpose, because it's assumed that you will know a lot of basics.
--The component values may be right within the context of the idea in the schem, but they may not be right for your needs.
--The process of going from a schem (even those that are known to work) to physical layout is loaded with minefields. Until you are sure of your skills, work from layouts that have been vetted.
-
Don't attempt to make a printed circuit board for a first build; that process is interesting and a lot of fun, but it has a learning curve of its own. If you want to use a PCB to cut down on wiring, buy one from one of the many good sources that offer ready-to-solder (RTS) boards. See my Links for a list. I also offer PCBs and kits for some of my own designs. Some, like the Ursa Minor are especially beginner-friendly.
-
Don't attempt to translate a breadboard layout, even one that works, directly to perfboard or Vero. They are different media, and the hard-wired layout needs to be thought out on its own terms. See next bullet.
-
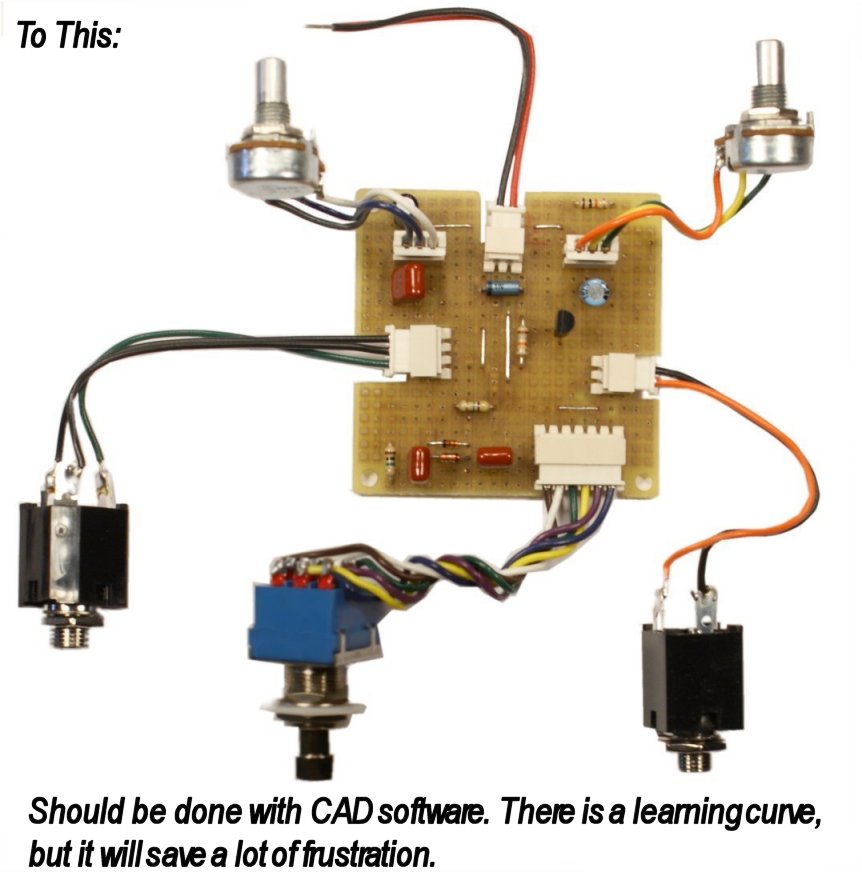
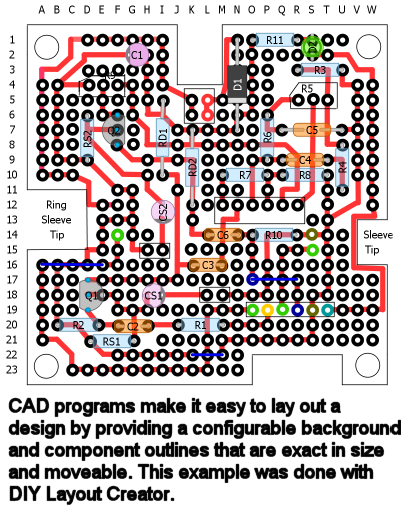
When planning a hard-wired layout, Don't use pencil-and-paper. Right from the beginning, learn to use a draw program that is optimized for this kind of work. Some, like DIY Layout Creator, are open-source, free, and not hard to learn.
-
Don't try to squeeze your build into an enclosure that's too small. Even though it may not look as pretty, pick a larger enclosure than what the designer tells you the build was done in. You will find it easier to work and easier to avoid short circuits. Ask for experienced help if you are not sure on this point.
-
Don't shop for parts or tools at Radio Shack until you have learned what to buy from people who have some experience. Even then, RS is pretty much an emergency resource, because their offerings are not stompbox-specific, not great quality, or both. There are now numerous mail-order sources for stompbox DIY other than my Cave, so you have lots of choices.
-
If you pick a kit for your first build, Don't make even the smallest mod or change until you have the thing working as the designer intended. The same caution applies to the the many "build-it-this-way" Veroboard and perfboard layouts that you can find on-line. Paying very close attention to duplicating every detail makes success more likely and makes it easier to find mistakes, if any.
-
Don't start to build expecting to save--or make--money. It's true that the ridiculous prices for classic pedals at auction can make it somewhat economical to build your own, but even in that special case, you need to learn A Lot to be able to do it right. And as far as competing with the economics of mass-market manufacturing, that's not possible. Three good reasons why you Would bother to learn:
--It's fun, educational and very satisfying.
--You can learn to make classic effects that sound different from modern ones and sometimes better than the originals.
--You can learn to mod effects to your liking and 'own your tone'.

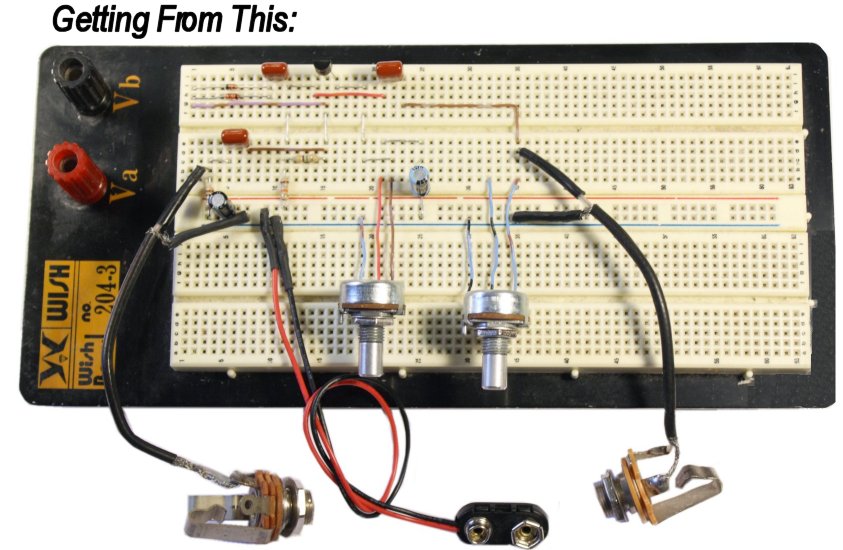
So, after avoiding all the Don'ts, what should you do first? Breadboard something simple! It should have no more than one stage, and no more than one transistor or IC. My Ursa Minor is good. I have also done a tutorial for Gus Smalley's Beginner Boost that you can find at diystompboxes.com
-
When you learn to breadboard, take the time and trouble to set up carefully, square off corners and establish clean lines the way I showed in the example above. This makes your work much easier to document later, and makes it easier for you (or other people) to find mistakes. A 'Rat's Nest' like the one on the right can be tolerated once you have some experience and need to try out an idea quickly, but it's a recipe for trouble for a beginner.

-
Once your first build works on the breadboard, find a vetted layout for it on perfboard or Veroboard and build it. This will force you to follow a layout painstakingly, solder connections and then debug when it doesn't work. It is much more difficult than doing a paint-by-number kit, but you will learn A Lot more.
-
Before you pick up tools, make sure that the ones you have are suitable and that you have all you need. Here is my reference on this subject.

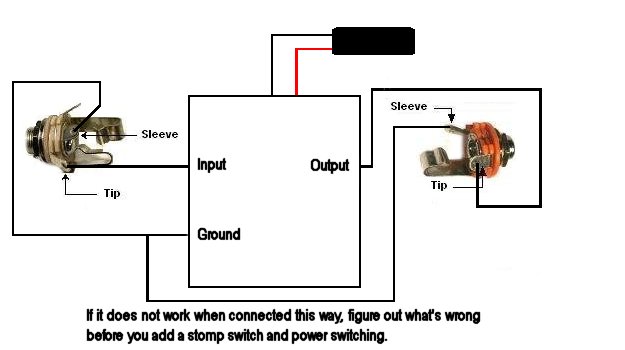
- Do your first testing before you add a stomp switch and wiring for power. Wire the input and output jacks directly to the board and connect a battery. If the circuit does not work at this stage, at least you know that the problem doesn't involve wiring to the switch.
- If the battery starts to feel warm, disconnect it NOW! There is a short circuit somewhere, and you need to find it before doing anything else. See the Troubleshooting Basics following.
Troubleshooting Basics
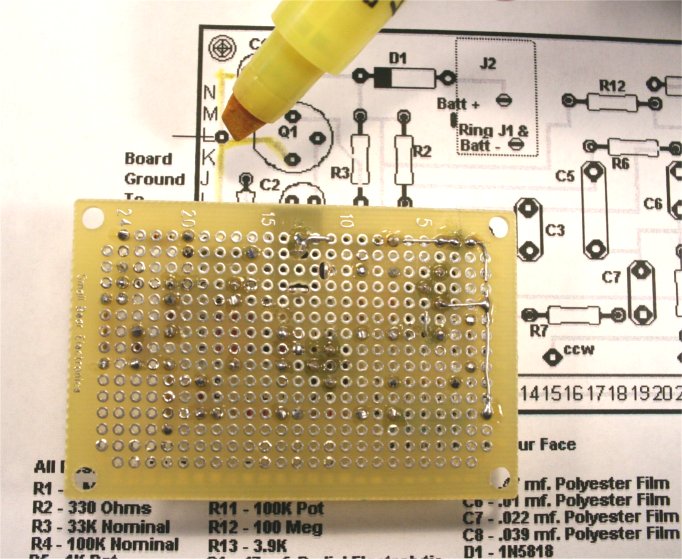
The first rule to keep in mind is that a build from a vetted layout is all-or-nothing; if Every Detail is correct, it will work--if not, it won't. The first thing to do is make clean copies of the schem and the layout. Then start at the input on the schem and use the continuity scale of a multimeter to make sure that every point that you think should be connected Really Is. Mark off connections with a highlighter as you test. I have used this method successfully to debug everything posted on my site.
If you want help from other DIYers, here is a super What To Do by R. G. Keen that lays out the information that is needed for other people to help you.
Have patience, don't give up, and expect to have to put your work down for awhile to let your mind clear. You will eventually have your 'Eureka' moment and be on your way to SATISFACTION!