By Steve Daniels, Small Bear Electronics LLC
© 2000 By Small Bear Electronics LLC
One of the most common questions asked by beginning electronics hobbyists is: "How do I draw neat, accurate schematics? Drawing by hand seems awfully inefficient, but I don’t want to spend a lot of money for special software."
Fortunately, there is a very good answer in the form of Microsoft Paint, the bitmap editor that is included in every copy of Windows. It’s free, and you can use it to easily create a whole palette of symbols like these:

I’ll show you in this article how to use Paint to create the palette, and the basics of how to use it to do great schematics. If you’ve never used a bitmap editor, you’ll start to learn how this sort of program works—a good thing for any twenty-first century professional or hobbyist to know.
I’m presuming that you’re familiar with the basic point-and-click functions of Windows 95/98, and that you have some experience with dragging objects between windows and cutting and pasting. I won’t presume that you already know Paint, so, if you do, please bear with my explanations of basic functions.
You can find the Paint application on the Windows Start menu under Programs/Accessories, but it is much more convenient to have a shortcut to it. If you don’t already have a shortcut icon for Paint on your desktop, figures 2 through 7 show how to put one there.


Creating Your First Symbol
There are a few differences in the menus between the versions of Paint that were supplied with Windows 95 and Windows 98. I was working with the later version when I did this article, but everything will still work with the 95 version. Just look a little bit for the command you need and don't panic.
We will be working with the Paint program opened in two windows--one for creating symbols and the other for storing them as a palette for later use. To begin, double-click the shortcut icon to start Paint. Reduce the application in size so that it is a window on the desktop. Now open a second instance of Paint and leave it maximized. The white background in this window should be 600 x 800 pixels in size, and figure 8 shows how to set this up if necessary. Symbols created in the smaller window will be copied to this one.

In the menu of the large window, click Options, and make sure that Draw Opaque is NOT checked. If Draw Opaque is checked, click on it to uncheck it. See figure 9.

Now go to the smaller window. While it is possible to "just draw" symbols if you have a very steady hand and good eyesight, I found it convenient to create a small "composition" area--65 by 20 pixels in this case—and draw symbols dot-by-dot. Figure 10 shows how to create the area.

Increase the zoom and change the view so that the background becomes a grid as in figure 11.

Let’s draw a resistor. As shown in figure 12, click the pencil tool and use it to fill in dots by clicking in the squares of the grid—almost like following a paint-by-number drawing! I have shown the proportions that I used for the symbol I created, but you can make your own choices depending on the look-and-feel that you want for your drawings.

See figure 13. Rubber-band the newly-created symbol and copy it to the clipboard (CTRL + C). Now go to the larger window and paste it on the palette (CTRL + V). Save the palette with the filename of your choice.
 >
>Return to the composition area. Unselect the resistor figure by clicking anywhere on the grid, and clear the grid by clicking fig/Clear fig on the Paint menu. Now draw a capacitor using the proportions shown in Figure 14. Copy this symbol to the palette and save the palette again.


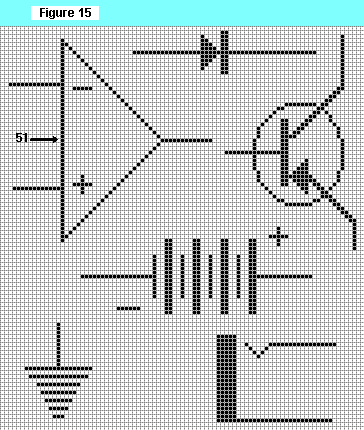
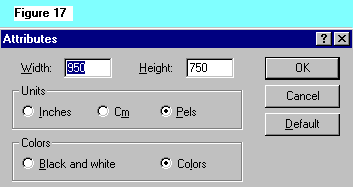
Figure 15 shows the proportions for a number of other common symbols, which you can also draw and copy to the palette. You will need a larger grid to draw the transistor and the op-amp, so, as you did earlier, set the size of the working area in the Attributes.
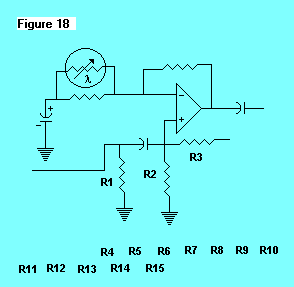
In order to speed the process of doing designations, I pre-typed a bunch of labels for resistors and capacitors--R1 through R15 and C1 through C15. When you have finished a drawing, it’s very easy to just copy a whole group from the palette and slide the labels into place individually. You can see this idea in the examples in Figure 18
Drawing Schematics
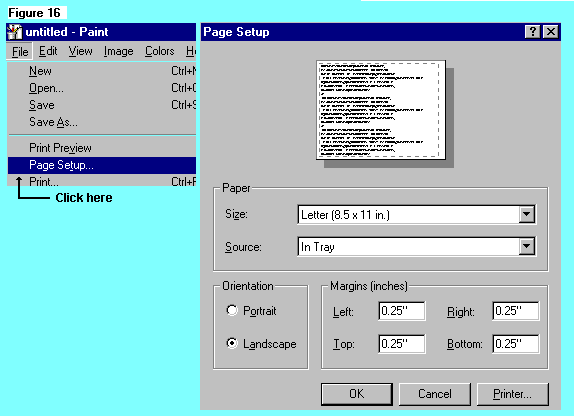
Once you have a full palette of symbols saved, drawing a schematic is very easy. Open the palette in one instance of Paint. Open a second instance for your schematic, and see Figure 16 for the page setup parameters. These will give you as much use as possible of an 8 ½ by 11 sheet in landscape orientation.

Figure 17 shows the setup for fig/Attributes.

Make sure that Draw Opaque is unchecked, and you are ready to go. Switch to the palette instance, rubber-band a symbol and copy it to the clipboard, switch to the schematic instance and paste the symbol to the schematic. To connect symbols, either select a symbol and move it so that its connecting line merges with another symbol, or add lines as needed. Remember to save the schematic occasionally as you work. Paint permits copying, cutting and pasting of any rectangular area, and you can use these functions to re-format the drawing as it grows and as your ideas change. Figure 18 shows a work in progress. For detailed instructions on how to use the tools on the Paint toolbar, consult the Help screens or a third-party reference.

It is entirely possible and desireable to construct "library" pages of commonly used circuit patterns (power supplies, amplifier stages, logic blocks, etc.) and have these available whenever you need them. Like any software tool, the palette is only a starting point; feel free to bend it to your own needs and tastes.
Other bitmap editors can also be used for this application; in particular, I can recommend PaintShop Pro by Jasc software. That package does everything you would want of a bitmap editor, is much more flexible than Paint for those functions, and includes many functions for creating and editing graphics that are not available in Paint. PaintShop Pro does cost money, but you can try out a fully functional evaluation copy before buying it.
To anticipate a question: yes, you could use the techniques described here to do PC board artwork by setting up a template and a palette of component outlines. However, while this method can be made to work for simple boards, I don’t recommend pursuing it. My reason is that there are a number of inexpensive CAD packages available that are optimized for creating PC boards. They are all capable of creating a file format—called a Gerber photoplot—that is understood by fabricators and designers all over the world. A bitmap editor is not suitable when you want to have a factory make a board for you. The package I use for doing board layouts is Ivex’s WinBoard. You can download a no-charge evaluation copy--fully functional up to 100 pins—from www.ivex.com.
I hope you enjoy using the schematic symbols you’ve created, and I welcome comments and questions. If you need to get down to work right away, I'll e-mail the complete palette of symbols to you for $10.00. See Ordering